

Virtual machines (VMs) are essential to modern computing. They allow us to run multiple operating systems on a single physical machine.
GPU Hardware VM is Disabled occurs when GPU virtualization is not enabled in your VM. To fix this, disable Hyper-V, enable GPU hardware in the BIOS, and configure GPU passthrough in your VM settings for better performance and rendering.
This guide will walk you through the process of enabling GPU in your VM, whether you’re using VMware, VirtualBox, or Hyper-V, and address common issues that may arise along the way. Let’s dive in!
What Does “GPU Hardware VM is Disabled” Mean?
The error message “GPU Hardware VM is Disabled” indicates that the virtual machine cannot access the host’s GPU directly; instead of utilizing the GPU’s hardware acceleration capabilities, the VM resorts to software-based rendering.
This results in significantly lower performance, especially when running graphics-intensive applications such as video games, machine learning tasks, or high-end data visualization.
In virtualized environments, GPUs are critical for offloading the computational and graphical workload from the CPU, enhancing both graphical performance and speed. The message typically appears in VMware, VirtualBox, or Hyper-V platforms when GPU virtualization is not enabled or misconfigured.
Why Does This Error Occur?
Several factors can prevent a VM from accessing the host’s GPU, resulting in the “GPU Hardware VM is Disabled” message.
These include issues with hardware settings, conflicts with other software, or the need for specific configurations in the virtual machine settings.
1. Hyper-V Interference
One of the most common causes of this issue on Windows systems is the interference of Hyper-V, the native hypervisor in Windows.
Hyper-V can conflict with third-party hypervisors like VMware and VirtualBox, blocking access to hardware resources like GPUs. If Hyper-V is enabled, it prevents other virtualization platforms from using the host’s GPU, causing the error message to appear.
2. Driver Compatibility
Driver compatibility is another significant factor. For GPU passthrough (where a GPU is directly assigned to a virtual machine), the GPU drivers and the virtualization software must be compatible.
Incompatibilities can arise with older GPU drivers or when the host and guest operating systems do not have the necessary updates for hardware acceleration.
3. BIOS/UEFI Settings
Hardware virtualization features such as Intel VT-x or AMD-V must be enabled in the system BIOS/UEFI. These features allow virtual machines to run efficiently and leverage the host’s physical hardware resources, including the GPU.
If these settings are turned off in the BIOS/UEFI, GPU virtualization will not be available, and the error message will appear.
4. Unsupported Hardware
Some older or lower-end GPUs may not support virtualization features like GPU passthrough or GPU sharing.
In such cases, even after configuring the necessary settings, you may still encounter the “GPU Hardware VM is Disabled” message due to hardware limitations.
How to Fix the “GPU Hardware VM is Disabled” Issue
1. Disabling Hyper-V
Since Hyper-V can prevent other hypervisors from using GPU hardware, turning it off if you’re running a third-party virtualization platform such as VMware or VirtualBox is essential.
Steps to Disable Hyper-V:
- Open Command Prompt as Administrator:
- Press Win + X and select Command Prompt (Admin) or Windows PowerShell (Admin).
- Execute the Command:
Type the following command and press Enter:
bcdedit /set hypervisorlaunchtype off
- Restart Your System:
- Reboot your computer to apply the changes. This will disable Hyper-V and allow other virtualization platforms to use the GPU.
Note: If you wish to re-enable Hyper-V, use the following command:
bcdedit /set hypervisorlaunchtype auto
Then, restart the system.
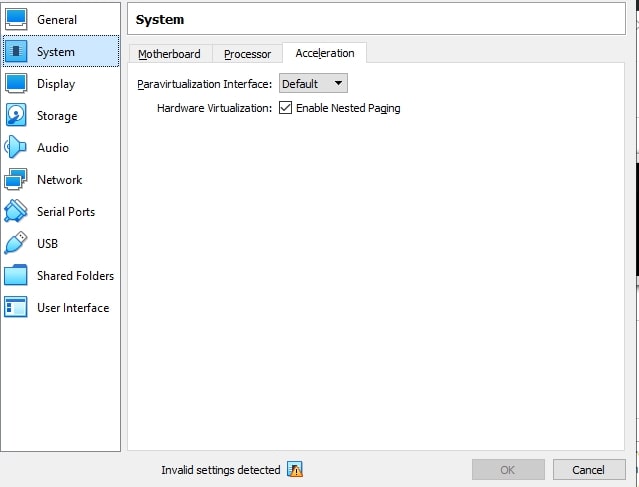
2. Enabling GPU Virtualization in BIOS/UEFI
To ensure GPU passthrough, you must enable virtualization features in the BIOS/UEFI. These features control how virtual machines interact with the host’s hardware, including the GPU.
Steps to Enable GPU Virtualization in BIOS/UEFI:
- Restart Your Computer:
- Power off and turn your system back on.
- Access BIOS/UEFI Settings:
- Press the appropriate key (often F2, Del, Esc, or F10) to access the BIOS/UEFI menu during the boot process.
- Navigate to the Virtualization Settings:
- Look for a setting related to Intel VT-x, AMD-V, or Virtualization Technology. Ensure that it is enabled.
- Save and Exit:
- Save your changes and exit BIOS/UEFI. Your computer will reboot with the new settings.
- Verify GPU Virtualization:
- Once you boot into your operating system, verify that GPU virtualization is enabled by checking the settings in your virtual machine manager (VMware, VirtualBox, etc.).
3. Ensuring Driver Compatibility
In some cases, the issue arises from driver incompatibility. Ensure that the GPU drivers on both the host and the guest OS are updated and compatible with your virtualization software.
Steps to Ensure Driver Compatibility:
- Update Host GPU Drivers:
- Ensure that the latest drivers for your GPU are installed on the host machine. Visit the manufacturer’s website (e.g., NVIDIA or AMD) to download the latest version.
- Update Virtualization Software:
- Ensure your VM platform (such as VMware or VirtualBox) is updated to the latest version. Check the software’s release notes for GPU support enhancements.
- Install Guest OS Drivers:
- Ensure the guest OS within the VM has the appropriate GPU drivers installed. This is especially important if you are using GPU passthrough.
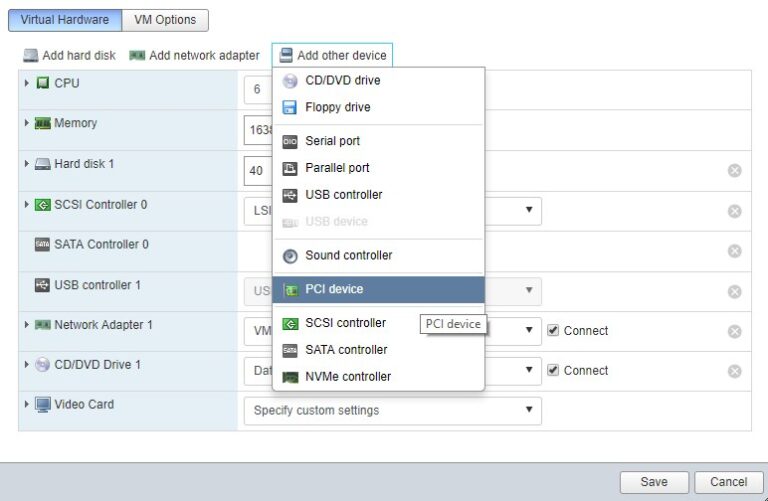
4. Configuring GPU Passthrough
If you use a dedicated GPU and want to assign it directly to a VM (GPU passthrough), you must configure it properly. This process typically applies to advanced setups where a virtual machine uses a GPU exclusively.
Steps to Set Up GPU Passthrough:
- Ensure Hardware Support:
- Check that your GPU and motherboard support IOMMU (Intel VT-d or AMD-Vi), which is necessary for GPU passthrough.
- Configure VM Settings:
- In your VM settings, allocate the GPU to the virtual machine by selecting the PCI passthrough option.
- Install the Necessary Drivers:
- Ensure the guest OS has the appropriate drivers for the GPU to ensure proper functionality.
Best Practices for Enabling GPU Virtualization
Below are the key best practices to follow when enabling GPU virtualization in virtualized environments.
1. Use Compatible Hardware
Verifying that both the host system and the GPU support the necessary virtualization technologies is crucial before setting up GPU virtualization.
- Check GPU Compatibility: Ensure your GPU supports virtualization features like GPU Passthrough or vGPU (virtual GPU). NVIDIA and AMD offer GPUs explicitly designed for virtualization workloads.
- Ensure IOMMU Support: Your motherboard and CPU should support IOMMU (Input-Output Memory Management Unit) or technologies like Intel VT-d or AMD-Vi, which are critical for enabling GPU passthrough to virtual machines.
- Use Dedicated GPUs: For the best performance and stability, it’s advisable to dedicate a GPU to the virtual machine instead of sharing the GPU with the host system. This is especially important for GPU-heavy tasks such as AI or video rendering.
2. Keep Software and Drivers Updated
Outdated software, including drivers and hypervisor platforms, can cause compatibility issues that prevent GPU virtualization from functioning correctly.
- Update Host GPU Drivers: Ensure the latest drivers for your host system’s GPU are installed. This will ensure compatibility with your virtualization software and the ability to utilize GPU features in the VM.
- Update Virtualization Software: Whether you’re using VMware, VirtualBox, or another platform, ensure you’re running the most recent version of the virtualization software. Updates often include improved support for GPU virtualization, bug fixes, and new features.
- Update Guest OS Drivers: The guest operating system in your VM should also have the appropriate drivers for the GPU, especially if you’re using GPU passthrough. This ensures that the guest OS can adequately recognize and utilize the GPU.
3. Ensure BIOS/UEFI Settings Are Correct
The BIOS/UEFI settings are critical when configuring GPU virtualization, as they control whether the system allows hardware resources like the GPU to be shared with virtual machines.
- Enable Virtualization in BIOS: Check that Intel VT-x (for Intel CPUs) or AMD-V (for AMD CPUs) is enabled. These settings are necessary for virtual machines to run efficiently and leverage hardware resources like GPUs.
- Enable IOMMU: If you’re using GPU passthrough, you must ensure that IOMMU is enabled in the BIOS/UEFI settings. This allows the system to map physical devices, like a GPU, directly to virtual machines.
- Disable Secure Boot (if needed): Some virtualization platforms require Secure Boot to be disabled for specific configurations, especially when using custom drivers or third-party virtualization software. Ensure this setting is adjusted if needed.
4. Allocate Sufficient Resources to Virtual Machines
For GPU virtualization to work optimally, you need to allocate enough resources, including CPU, RAM, and disk space, to the virtual machines (VMs).
- Allocate Sufficient RAM: Ensure the virtual machine has enough memory to handle the GPU workloads efficiently. Insufficient RAM can lead to poor performance and instability.
- Configure CPU Resources Appropriately: Assign sufficient CPU cores to the VM to avoid performance bottlenecks, especially when using GPU-intensive applications that require parallel processing.
- Optimize Disk Space: Ensure enough storage is allocated for both the OS and applications inside the VM, as well as for GPU-intensive tasks like video rendering or machine learning.
GPU Hardware VM is Disabled Windows 10
When “GPU Hardware VM is Disabled” appears on Windows 10, GPU virtualization is not enabled. You should check BIOS settings, disable Hyper-V, or update drivers to allow your virtual machine to use the GPU.
GPU Hardware VM is Disabled Windows 7
In Windows 7, “GPU Hardware VM is Disabled” means the virtual machine can’t use the GPU. To fix this, ensure that virtualization is enabled in BIOS and update your graphics drivers to allow GPU passthrough or sharing.
Hyper-V 3D Acceleration Windows 11
To enable Hyper-V 3D acceleration in Windows 11, turn on Hyper-V and enable 3D hardware acceleration in the virtual machine settings. This lets the VM use the host GPU for better graphics performance in supported applications.
How to Enable GPU in Virtual Machine
To enable GPU in a virtual machine, ensure your hypervisor supports GPU passthrough or vGPU. Enable virtualization in BIOS, install the correct GPU drivers, and assign the GPU to the VM through your hypervisor settings, such as VMware or Proxmox.
VMware ESXi GPU Passthrough
VMware ESXi GPU passthrough allows a VM to use a dedicated GPU. You must enable IOMMU in BIOS, configure the GPU in ESXi settings, and assign the GPU to the virtual machine for high-performance tasks like gaming or AI workloads.
Proxmox Turn Off GPU
In Proxmox, you can disable GPU passthrough in the virtual machine configuration to turn off the GPU. This stops the VM from accessing the GPU, allowing the system to use it for other tasks or applications.
Enable GPU Passthrough Hyper-V
Disable Hyper-V’s default GPU settings and configure a virtual machine to use the host’s physical GPU to enable GPU passthrough in Hyper-V. Also, enable hardware acceleration in the BIOS and use Windows Server with the appropriate GPU.
ESXi GPU Passthrough Gaming
For gaming on ESXi with GPU passthrough, assign a dedicated GPU to the VM by enabling passthrough in the ESXi settings. This allows the VM to use the GPU directly, offering improved graphics performance in games or resource-demanding applications.
FAQs
1. How do I enable GPU in VM?
To enable GPU in a VM, enable virtualization in BIOS and configure GPU passthrough or vGPU in your hypervisor settings.
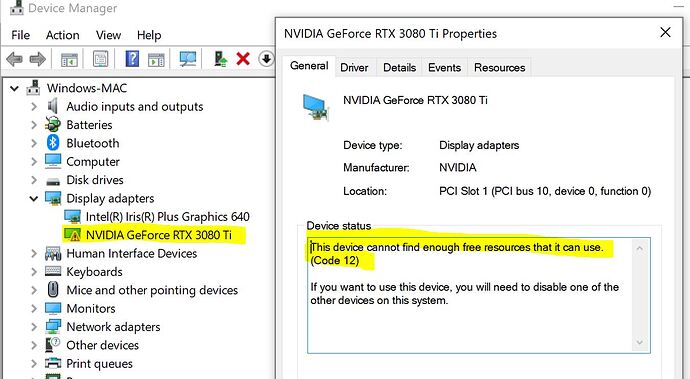
2. What happens if I disable the GPU in Device Manager?
Disabling the GPU in Device Manager stops the system from using the GPU, causing the machine to use software rendering.
3. What is VM in GPU?
A VM in GPU refers to a virtual machine that uses a GPU for hardware acceleration, improving graphics and processing performance.
4. How do I enable GPU support?
To enable GPU support, ensure your system’s BIOS has virtualization enabled and configure GPU passthrough in your virtual machine settings.
5. How do I enable GPU emulation?
GPU emulation allows software to simulate GPU features. Enable it in your VM settings or use tools like QEMU for emulation.
6. What are the requirements for GPU passthrough in VMware?
You need a compatible GPU, enabled IOMMU in BIOS, and VMware ESXi with passthrough settings for GPU passthrough in VMware.
7. How to create GPU VM?
Configure GPU passthrough or vGPU in your virtualization software to create a GPU VM and assign the GPU to it.
8. How do I enable GPU in Device Manager?
To enable the GPU in Device Manager, right-click the GPU under Display Adapters and click “Enable” if it’s disabled.
9. How do I check my GPU VM?
To check your GPU VM, use monitoring tools or the VM’s settings in your hypervisor to see GPU usage.
10. How do I enable GPU in VirtualBox?
In VirtualBox, enable 3D acceleration in the VM settings under Display, then configure the system to allow GPU use.
Conclusion
In conclusion, the “GPU Hardware VM is Disabled” error can be fixed by ensuring proper BIOS settings, disabling Hyper-V, updating drivers, and configuring GPU passthrough in your VM settings. These steps improve performance for GPU-intensive tasks in virtual machines.